Today’s entry is a post-mortem of the 6 day, 19 hour long process of upgrading my website, www.brtw2.com, so that I could write a blog post about modifying a cheap, flash speedlite that I purchased on AliExpress.com. This process was not for the faint of heart and required learning, experimentation, patience, and I’ll close out with YMMV. Making sure you maintain several back-ups of your install is a requirement before proceeding. If you are currently disconnected from JetPack, this process will help you repair that connection. I was able to upgrade from version 3.7.5 to 14.1 and reconnect my JetPack account as a result. This website is now using an SSL certificate, free from ssl.com (90 days per free cert), which allows for user accounts and other basics that blog readers are familiar with. This guide will use tools that you may have to learn to use and I encourage you to dive deep where necessary. Using my own time, this upgrade cost me $1400 in labor and $0.00 in new software.

This is the result I was aiming for at the start of this process. I started with 4.3.34 installed and running, but wanted to utilize JetPack for posting from mobile. Being several software revisions behind, that link was not possible. The last time this blog had been updated previously was 2015 when I completed blog consolidation which you can read more about here.
Starting with 4.3.34

First off, I had to determine where my install was located as it had been a few years since I had last logged into my hosting service. I’m on a very basic plan with limited space, databases, and ability to use older installations of PHP without additional pay. My cost for hosting is currently < $60/year. To purchase access to older versions of PHP installs, I would have had to go up to at least the $160/yr plan. This would have been the most straight forward of the upgrades as I would have been able to incrementally update my WordPress install and avoiding the major issues encountered.

Once I was in my hosting account, I remembered that I did not have the domains registered with the hosting company. This wouldn’t end up being an issue as anyone who has ever maintained separate hosting can tell you. One of the first issues I ran into was the lack of a valid SSL certificate when attempting to update WordPress. I would later realize that the SSL error I was receiving was a result of how the update routine, update-core.php, was trying to access WordPress’s website. More on that later.

I’m going to skip over the steps above, this guide will assume you can match up the above titled items with the steps you’ll find in the next step with your certificate signing company. For today’s guide, I’ll be using SSL.com
Installing a valid SSL certificate
SSL.com sells free, 90-day certs to anyone who can validate their identity (affiliate link). I felt completely comfortable using their service as I had previously purchased certificates from them and was familiar with the overall process. One additional step I took with SSL.com was confirming my own identity. I had no concerns turning over my credentials (in the form of a driver’s license) to SSL as they are a security organization that is trusted with securing the internet.

To get a 90-day cert for a website, you need to validate that you own that website. Email validation was deprecated 14 days earlier than my attempt to validate my install.
As of 4/29/2026: email validation has returned and consists of clicking Validate by email and then submitted that form page before an email will be sent 45 minutes later (no improvement to the mandatory holding period).
The second method of validation offered to me was to download a file and load it into a specific directory on my host server. This was straightforward, but took 45 minutes to complete due to 15 minute waiting periods. Removing those specific files after the verification is very important.

To get the file into your hosting server, either use cPanel, FTP (such as filezilla or winscp), or the host’s file system webpage to create the directory needed (or directories), download your validation file and click ‘Validate’.

A quick intro to cPanel is necessary to explain the steps ahead. cPanel is our way to interface with a hosts server in a way that’s straight forward and can both permit and restrict access to certain features. In my cPanel above, you can see 2 installations of this blog and more Features Applications below. Most of the time applications use mySQL databases. My hosting plan grandfathered in my 9 mySQL databases at the time of working through this. Here is where I made one mistake, my hosting company does not accept ECDSA P-384 certificates, despite having it as an option in cPanel.

After downloading my certificate shown above, cPanel was used to complete all of the SSL steps necessary for me to get a valid cert for brtw2.com. I’ll mention again if you did not already complete this bold step above, but removing those specific, verification files after the verification is very important. Alternatively, modifying the file to permission 600 or lower would also work.

I had to locate my SSL/TLS folder. My folder is located under Security in cPanel.

The ECDSA P-384 option was my preferred choice, however it never ended up validating. Once I realized that I would be required to use an RSA-2048 cert, I went and purchased a second, free cert and completed the set-up a second time, which took another 45 minutes to complete.

Saving your certs with usable names is a great way to organize your ssl cert folder. I download all of my copies and store them locally, saving them by renewal date. You’ll need to save this file to upload it in the next step in cPanel or where ever your host let’s you upload SSL certificates.

You’ll know you have a certificate when the filetype is a .crt. Next, we’ll navigate back to our SSL/TLS folder.

In my cPanel, I’ve selected Manage SSL sites.

Shown here is my successful install with many subdomains listed as insecure. These red locks are for subdomains that my Free cert doesn’t cover and I’m more than okay with that. More broad certificates are available to cover all subdomains on ssl.com (affiliate link). To upload your certificate with filetype .crt, click Browse Certificates.

On top of the pop-up (it’s moveable in cPanel) is a link to Certificates page. If you do not have any certs showing in your list, let’s upload those!

Uploading the cert file (.crt) if my preferred method and once uploaded, Install your SSL certificate and run the SSL Scanner on ssl.com.

I’ve gone back to ssl.com and run my scanner and all attributes are checking out good now that I have the RSA 2048 cert properly installed. With a proper certificate installed on this blog, I thought my troubles would be over, but I was about 13+ hours incorrect.
Discovering the main problem, WordPress’s own cert
WordPress updated all of it’s security certificates in version 4.4.1. This was an issue as this guide assumes you’re starting on 4.3.34, which is older than 4.4.1. I discovered this issue while doing basic google searches for how to update 4.3.34 and reading WordPress patch notes straight from their documentation library. Thank you to WordPress for having such a great and deep library, I knew updating would be a challenge, but not “download and update certificates IN WORDPRESS” difficult. This step isn’t difficult, but identification of what’s actually wrong was quite hard.

How I managed to navigate to the .crt file for WordPress, I cannot remember, but you can download a copy for yourself here https://raw.githubusercontent.com/WordPress/WordPress/master/wp-includes/certificates/ca-bundle.crt. This file needs to be placed in the directory where your expired certificate is located.

My expired WordPress cert file was renamed .old and the .crt from above was placed in that directory. This solved the invalid, insecure redirect that prevented me from updating due to a bad SSL request coming from my WordPress update-core.php file. Clicking the Update Now button finally got the ball rolling and it would be the last time (after backing up) that I would see this in my host’s dashboard:


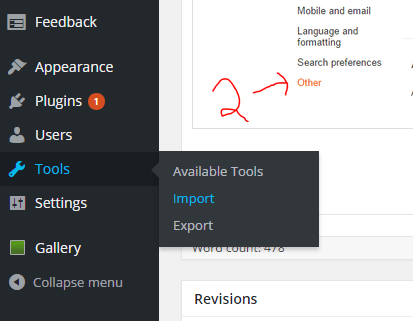
My own WordPress finally was updated to a version from the passed 5 years, 6.2.6. Unfortunately, this would not be the final solution as going any further would require .htaccess issues to be troubleshooted.

.htaccess and how to update to 6.7.1
I’m torn about how much of this troubleshooting to include. Modifying your .htaccess file is kind of like realizing while growing up that your home town is just a drop in the bucket that is the world. Working on troubleshooting .htaccess is going to prevent access to your website when you modify it incorrectly. If you have access to Apache Handlers in cPanel, this is also a viable path forward, but Apache Handlers is a 2-way program within cPanel, modifying your .htaccess file will modify the Apache Handlers and visa verse.

My host’s cPanel allows me to select from php 8 through 8.3. Going back to the very beginning of this blog post, I didn’t want to pay out $100+ so be able to just install an old version of php to update WordPress. In the end, I spent $1400 in labor hours solving this issue over the course of 5 days. I’d still go through this ordeal the way I did, frustration and long nights included, because this is valuable, knowing how to bring blogging software back from the 2010s and into the modern era is vital to keeping information alive. What this meant is that the final solution was to spoof different versions of php. To do this in .htaccess is the same as cPanel, but to introduce a new item, let’s navigate to our .htaccess file via FTP:

I use a software from the early 2000s called Bluefish for development. I use more powerful and useful software too, but working in raw code has it’s time and place.

A quick note on how to get files in FileZilla to associate with your editing software of choice, Edit > Settings > File editing > Filetype associates. That first row of the “Custom filetype associations:” is for all associations and “htaccess” does nothing more than reassure me that I can do version control. Version control? Remember how I said that modifying your .htaccess file will prevent you from accessing your site? Make sure you have 1 good copy, store it somewhere safe, email it to yourself.

Important things of note when looking at an .htaccess file: Comment out lines with “# ” and “AddHandler” enables installations of applications. Knowing if your host is running Linux or Windows is finally important. For this guide, I’m using Linux and my applications require a specific style:
# AddHandler application/x-httpd-alt-php56___lsphp .php
AddHandler application/x-httpd-alt-php56___lsphp .php5
AddHandler application/x-httpd-alt-php70___lsphp .php70
AddHandler application/x-httpd-alt-php71___lsphp .php71
AddHandler application/x-httpd-alt-php72___lsphp .php72
AddHandler application/x-httpd-alt-php73___lsphp .php73
AddHandler application/x-httpd-alt-php74___lsphp .php74
AddHandler application/x-httpd-alt-php83___lsphp .php83
# AddHandler server-parsed .php
AddHandler application/x-httpd-alt-php74___lsphp .php
For me, I eventually was able to clear that 5.6.40 php versioning error by running .php as 7.4. I’ll show the result and then a fun exercise that helped me get to this point.

By going and making every version from 5.6 “run” .php files, I was able to find a version that worked. For me, that version was 7.4 as seen in the picture/code above. See, this took a lot for me to believe. I knew that my host had updated me to php version 8.3 because I had selected that. Why WordPress told me this:
Was that one line of code in .htaccess, a line that was there when I started this ordeal and thought nothing of it, this line:
# AddHandler application/x-httpd-alt-php56___lsphp .phpIt’s commented out now, but when I started, I didn’t connect the dots between “56” and version “5.6.40”. If you can run .php and have webpages load, then try doing the following: make a new .php file and name it “phpinfo.php”. In that file, insert the following code so that when you load that .php file as a webpage, it tells you what version of php you’re running, the “phpversion();” portion of the file:
<?php
    // Get the software version directly using the phpversion() function
    $softwareVersion = phpversion();
    // Display the software version
    echo "Current Software Version: " . $softwareVersion;
?>
Save this and upload it to your top level directory

In your URL bar, navigate to that file, for me I get this

Changing my .htaccess file so that the 74 is a 73 produces the following

And 83? 83 displays and runs this version of php

So we really do have control over what version our .php files are executed in and once I selected version 7.4 I was greeted with this final screen

And this my friends is the last step necessary before relinking your JetPack account.

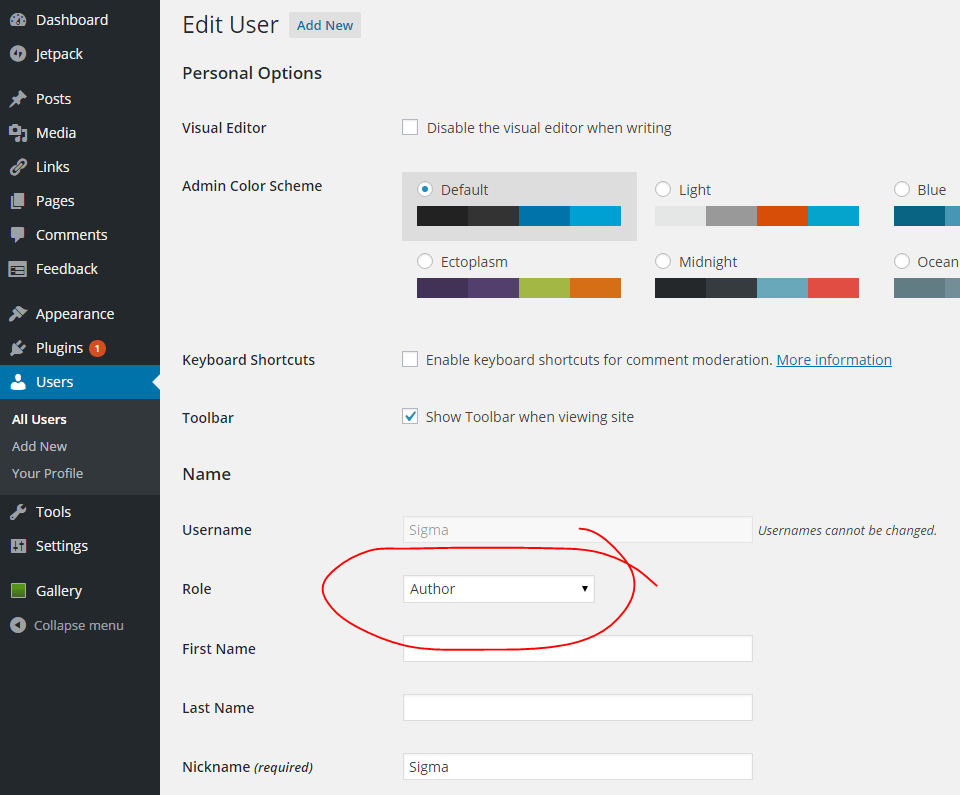
The update ran for a couple minutes and I was greet with this welcome screen. I’m still not running php 8 and that’s okay, I have many plugins and other updates to run. If any theme or plugin cannot run on php 8, the whole blog will not load and thus I have more hours of work ahead of me. But for now, I have entered hour 20, my hosting website’s Installatron is satisfied

And there is no more to do. If you require access, my rates should be discernable from the dollar figures throughout this post. Good luck and I’ll see you in the comments. i am brtw.